A MeshLayout is a layout manager that implements an
extensible grid
(mesh): cells in
the same
row get the same height and cells in the same column get the same
width.
The row heights/column widths are calculated calling getPreferredSize
on the
components of the row/column and set to the maximum of the
heights/widths.
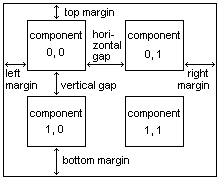
Components are laid out in a grid like manner, leaving space
between components (gaps) and between the boundaries of the container
and
the components inside (margins).
MeshLayout offers a combination of constructors to
allow to
specify any combination of gaps and margins:
MeshLayout(int rows, int cols) |
a default value is used as vertical and horizontal gap and for all margins |
MeshLayout(int rows, int cols, int gap) |
the specified value is used as vertical and horizontal gap and for all margins |
MeshLayout(int rows, int cols, int hgap, int vgap) |
the specified vertical and horizontal gaps are used, hgap is used for left and right margins and vgap is used for top and bottom margins |
MeshLayout(int rows, int cols, Insets margins) |
a default value is used as vertical and horizontal gap, along with the specified margins |
MeshLayout(int rows, int cols, int gap, |
the specified value is used as vertical and horizontal gap, along with the specified margins |
MeshLayout(int rows, int cols, int hgap, int vgap, |
the specified vertical and horizontal gaps are used, along with the specified margins |
In most cases the default configuration can be used, without worrying about margins and gaps.
Let's create a JFrame whose contentpane layout is a MeshLayout
with
4 columns and an unspecified number
of rows:
    JFrame f = new JFrame("MeshLayout Horizontal Test");
    f.setDefaultCloseOperation(JFrame.EXIT_ON_CLOSE);
    Container c = f.getContentPane();
    c.setLayout(new MeshLayout(0, 4));
Components will be disposed horizontally in the container, one aside
of the other, until the specified number of columns is reached, then
the placement starts on the next line. Now let's add some components to
it:
    JLabel label;
    for (int num = 0; num < 11; ++num)
    {
      label = new JLabel("element " + num);
      label.setBorder(BorderFactory.createLineBorder(Color.black));
      c.add(label);
    }
    f.pack();
    f.setVisible(true);
The above code creates the following frame:
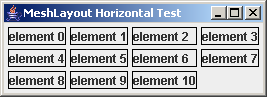
A border has been added to the labels (through the setBorder
method,
you can see it in the code) to better see how the placement works. As
you can see the third column is wider than the others, this is because
the "element 10" label is wider than the other labels in the column.
The width of the other components in the column is enlarged to match
this component's width, but the components in the other columns
aren't influenced. Note also that an element is missing from the last
row, the cell is left empty, but it takes its space like any other cell.
Another example, this time arranged vertically:
    f = new JFrame("MeshLayout Vertical Test");
    f.setDefaultCloseOperation(JFrame.EXIT_ON_CLOSE);
    c = f.getContentPane();
    c.setLayout(new MeshLayout(4, 0));
    for (int num = 0; num < 15; ++num)
    {
      label = new JLabel("element " + num);
      label.setBorder(BorderFactory.createLineBorder(Color.black));
      c.add(label);
    }
    f.pack();
    f.setVisible(true);
The above code creates the following frame:
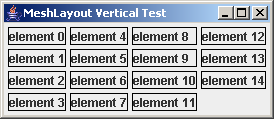
This time the placement is vertical, due to the fact that the number
of columns is zero, as can be seen by the label numbering, that goes up
to down first and then left to right. The last two columns are wider
for the reasons already explained above.
Note that in these examples the height of the components is always the
same, this means that you can't see the rows enlarging, but the
mechanism is the same: if a component of the row is taller than the
others, then the row height is augmented, and all elements in the
row are made taller. The example in the following chapter shows also
this behavior.
By default a MeshLayout is not resizable, therefore once its size is
calculated it won't react to resizing events. There are two methods to
decide the mesh behavior to resizing events:
void setExpandRow(int expandRow) |
sets the column that will expand
horizontally when the container is resized |
void setExpandColumn(int expandCol) |
sets the row that will expand
vertically when the container is resized |
In this way one row and one column can be set to react to resizing
events, letting the other rows and columns unchanged. Note that
specifying both an expand row and an expand column, you'll get a cell
that will expand in both directions.
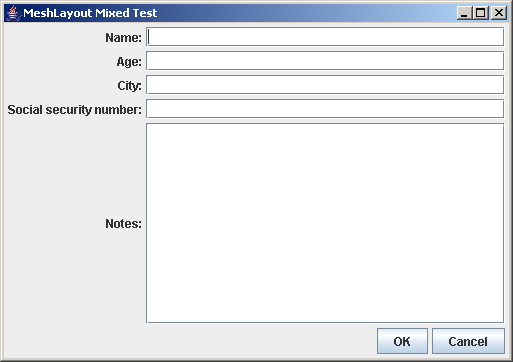
Let's see a final example:
    f = new JFrame("MeshLayout Mixed Test");
    f.setDefaultCloseOperation(JFrame.EXIT_ON_CLOSE);
    c = f.getContentPane();
    MeshLayout layout = new MeshLayout(0, 2);
    layout.setExpandColumn(1);
    layout.setExpandRow(4);
    c.setLayout(layout);
    label = new JLabel("Name:", JLabel.RIGHT);
    c.add(label);
    JTextField text = new JTextField(24);
    c.add(text);
    label = new JLabel("Age:", JLabel.RIGHT);
    c.add(label);
    text = new JTextField(3);
    c.add(text);
    label = new JLabel("City:", JLabel.RIGHT);
    c.add(label);
    text = new JTextField(24);
    c.add(text);
    label = new JLabel("Social security number:", JLabel.RIGHT);
    c.add(label);
    text = new JTextField(16);
    c.add(text);
    label = new JLabel("Notes:", JLabel.RIGHT);
    c.add(label);
    JTextArea area = new JTextArea(4, 24);
    c.add(new JScrollPane(area));
    c.add(new JLabel()); // empty cell
    layout = new MeshLayout(1, 3, new Insets(0, 0, 0, 0));
    layout.setExpandColumn(0);
    JPanel buttonsPanel = new JPanel(layout);
    buttonsPanel.add(new JLabel()); // empty cell
    buttonsPanel.add(new JButton("OK"));
    buttonsPanel.add(new JButton("Cancel"));
    c.add(buttonsPanel);
    f.pack();
    f.setVisible(true);
The above code creates the following frame:
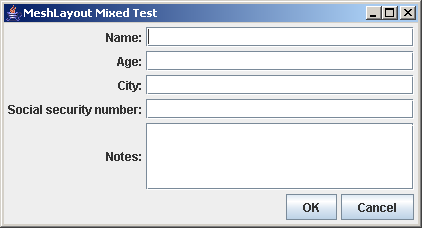
First let's look at the first few lines in bold.
    MeshLayout layout = new MeshLayout(0, 2);
    layout.setExpandColumn(1);
    layout.setExpandRow(4);
The layout is created with two columns and an unspecified number of
rows. Then the second column is set to be expandable (indexes are zero
based), and the fifth row is set to be expandable. As you can see from
the figure, the second column is the column with all the text fields,
so that they will expand horizontally when the frame is made wider.
This can be useful for an user that wants to see more text than she has
available at the default frame size: enlarging the frame she will get
bigger text fields.
And the fifth row is the row with the Notes text area, so that it will
expand also vertically, letting the user decide how many rows of text
to see at once. Here is the same frame after a resize:
As you can see, all the text fields are wider and the text area is also
taller. Note that the "Notes:" label is taller too, this can be seen
because a JLabel by default centers vertically its text. You can change
this behavior using the JLabel API, as done in the example, in which
all labels are aligned right.
Now let's look at the second part of the example:
    c.add(new JLabel()); // empty cell
    layout = new MeshLayout(1, 3, new Insets(0, 0, 0, 0));
    layout.setExpandColumn(0);
    JPanel buttonsPanel = new JPanel(layout);
    buttonsPanel.add(new JLabel()); // empty cell
    buttonsPanel.add(new JButton("OK"));
    buttonsPanel.add(new JButton("Cancel"));
    c.add(buttonsPanel);
The last row of the first MeshLayout contains the OK and Cancel
buttons. They are put in the second column by adding an empty label in
the first column, and they are put in a nested MeshLayout. This second
MeshLayout has one row and three columns, with the first column
set to be expandable, containing an empty label. This trick permits to
align the buttons to the right, because the first empty cell will grow
to adapt to the width of the column in which this nested MeshLayout is
put (that is expandable too). Note also that the margins are all set to
0, this has been done to avoid to add the default margins of the nested
MeshLayout to the gaps and margins of the enclosing MeshLayout.
All the software, either in binary or source form, and this accompanying documentation is subject to the following conditions:
  Copyright © 2006, 2007 Roberto Mariottini. All rights reserved.

  Permission is granted to anyone to use this software in source and binary forms
  for any purpose, with or without modification, including commercial applications,
  and to alter it and redistribute it freely, provided that the following conditions
  are met:

  o  Redistributions of source code must retain the above copyright notice,
     this list of conditions and the following disclaimer.
  o  The origin of this software must not be misrepresented; you must not
     claim that you wrote the original software. If you use this software
     in a product, an acknowledgment in the product documentation would be
     appreciated but is not required.
  o  Altered source versions must be plainly marked as such, and must not
     be misrepresented as being the original software.

  THIS SOFTWARE IS PROVIDED BY THE COPYRIGHT HOLDERS AND CONTRIBUTORS "AS IS" AND
  ANY EXPRESS OR IMPLIED WARRANTIES, INCLUDING, BUT NOT LIMITED TO, THE
  IMPLIED WARRANTIES OF MERCHANTABILITY AND FITNESS FOR A PARTICULAR PURPOSE
  ARE DISCLAIMED. IN NO EVENT SHALL THE COPYRIGHT OWNER OR CONTRIBUTORS BE LIABLE
  FOR ANY DIRECT, INDIRECT, INCIDENTAL, SPECIAL, EXEMPLARY, OR CONSEQUENTIAL
  DAMAGES (INCLUDING, BUT NOT LIMITED TO, PROCUREMENT OF SUBSTITUTE GOODS
  OR SERVICES; LOSS OF USE, DATA, OR PROFITS; OR BUSINESS INTERRUPTION)
  HOWEVER CAUSED AND ON ANY THEORY OF LIABILITY, WHETHER IN CONTRACT, STRICT
  LIABILITY, OR TORT (INCLUDING NEGLIGENCE OR OTHERWISE) ARISING IN ANY WAY
  OUT OF THE USE OF THIS SOFTWARE, EVEN IF ADVISED OF THE POSSIBILITY OF
  SUCH DAMAGE.